Wireless headphones may occasionally connect without producing sound, disrupting work, entertainment, and communication. This guide offers effective solutions to help resolve the issue and restore normal use quickly.
1. Update Drivers
Outdated or corrupted drivers can lead to headphones being connected but no sound. Ensuring that your audio drivers are up-to-date is crucial to resolving this issue. Driver Sentry is recommended for automatically detecting and updating drivers, saving time and avoiding the risk of installing incorrect drivers.
Download the latest version of Driver Sentry, install it, and open the software. Click "Scan".

After scanning, the software will list drivers that need installation or updates. Locate the audio driver and click "Upgrade".
Once the update is complete, restart your computer to ensure the updated driver functions correctly.
2. Check Hardware Connections
Ensure the Bluetooth connection between your wireless headphones and computer is stable. Disconnect and reconnect the headphones if needed.
Check if the headphones have sufficient battery power, as low battery levels can cause audio output issues.
If the connection appears fine but there's still no audio, restart your computer or phone and reconnect the headphones.
3. Check Volume Levels
Use the volume control buttons on the headphones or the device's volume settings to ensure the volume is turned up.

On a computer, check the operating system's volume settings to confirm it's not muted or set too low.
If the issue occurs with a specific app (e.g., music or video players), check the app's volume settings and ensure it's not muted.
4. Set Default Playback Device
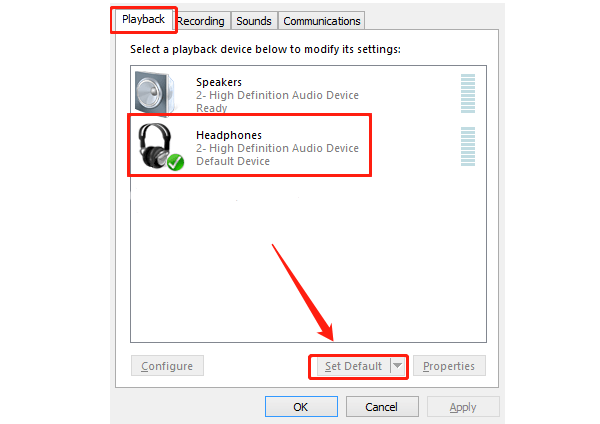
Right-click the volume icon in the bottom-right corner of the taskbar and select "Sounds".
Turn to the "Playback" tab, locate your wireless headphones, right-click them, and choose "Set Default".

Confirm the settings and restart your computer to check if the headphones now output audio.
5. Enable Bluetooth Support Services
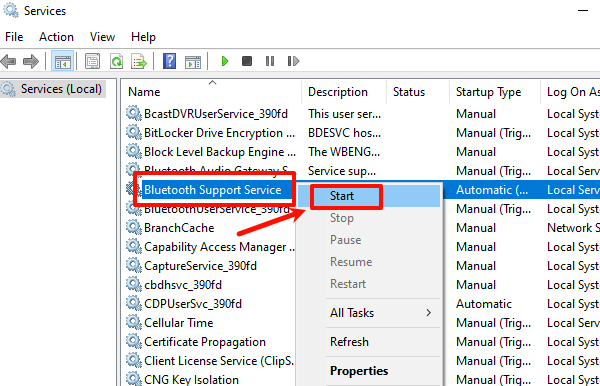
Press Win + R to open the Run dialog, type "services.msc", and press Enter.
In the services list, find "Bluetooth Support Service", right-click it, and select "Start".

Ensure the "Startup Type" is set to Automatic. Right-click the service, choose "Properties", and select "Automatic" from the dropdown menu.
After starting the service, check if the headphones produce sound.
6. Run Windows Troubleshooter
Open the Settings menu (Win + I) and click "Update & Security".
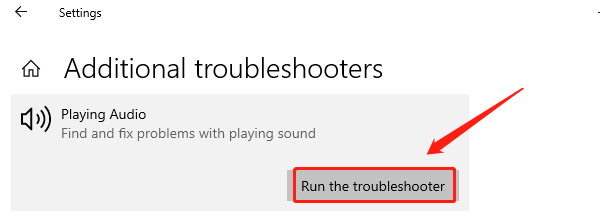
Select "Troubleshoot" > "Additional Troubleshooters".
Locate "Playing Audio" and click "Run the Troubleshooter".

The system will automatically scan for and fix audio-related issues.
Follow the on-screen instructions and check if the headphones function properly afterward.
Following these steps should help fix wireless headphones connected but with no sound. If the issue continues, contact the manufacturer or technical support for further help.
See also:
Fix WDF_Violation Blue Screen Error on Windows
How to Fix Monitor Connected but No Signal