Screen flickering is a common issue in Windows 11, causing the screen to blink or jitter. This article offers solutions to quickly fix the problem and restore normal operation.
1. Update Display Drivers
Display drivers are critical components that control the screen's functionality. Outdated or corrupted drivers can cause screen flickering, so updating or repairing them is an effective solution. Driver Sentry is recommended for automatic driver detection and updates, saving time and avoiding errors during installation.
Download the latest version of Driver Sentry, install the software, and open it. Click "Scan".

After the scan, identify the display driver in the results list and click "Upgrade".
Restart your computer after updating the drivers to ensure the changes take effect.
2. Check Monitor and Cables
Ensure that the monitor cables (e.g., HDMI, VGA, or DisplayPort) are securely connected.
Replace the cables to rule out potential damage.
Connect the monitor to another computer to determine if the issue persists. If the monitor works fine with another device, the problem may lie in your hardware or drivers.
If the monitor itself is faulty, consider repairing or replacing it.
3. Check Task Manager for Flickering
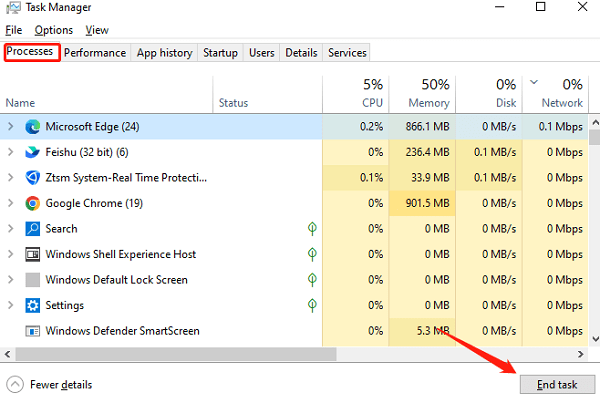
Press Ctrl + Shift + Esc to open Task Manager.
Check for abnormal processes or those consuming high CPU or memory resources.
If a specific program or process is using excessive resources, right-click it and select "End Task" to see if this resolves the flickering.

Navigate to the "Startup" tab in Task Manager and disable unnecessary startup items. Restart the computer to check for improvements.
4. Adjust Screen Refresh Rate
Open Settings and go to "System > Display > Advanced display settings".
Click "Display adapter properties" and select the Monitor tab.
Under "Monitor" Settings, try different refresh rates. It's recommended to set it to 60Hz or higher, depending on your monitor's maximum refresh rate.
Click "Apply" and check if the flickering issue is resolved.
5. Uninstall Incompatible Applications
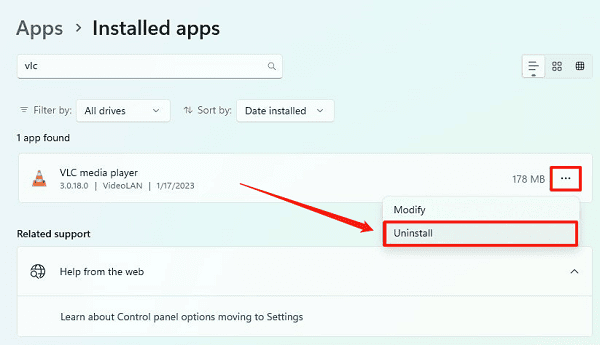
Press Win + I to open Settings, then select "Apps".
Click "Installed apps", and locate recently installed programs.
Identify applications that may interfere with display functionality, select them, and click "Uninstall".

Restart your computer and check if the screen flickering persists.
6. Disable Hardware Acceleration
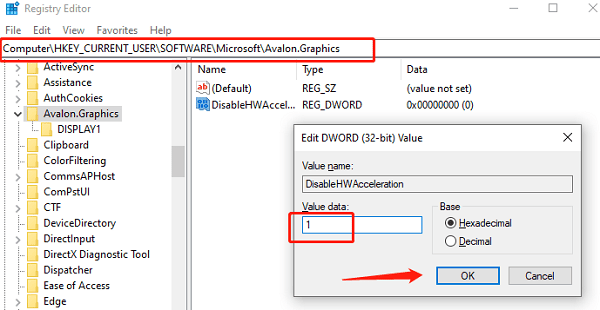
Press Win + R, type "regedit", and press Enter to open the Registry Editor.
Navigate to the following path: HKEY_CURRENT_USER\SOFTWARE\Microsoft\Avalon.Graphics
In the right pane of Avalon.Graphics:
If a key named DisableHWAcceleration exists, double-click it and change the value data from 0 to 1.
If the key doesn't exist, right-click an empty space, select "New > DWORD (32-bit) Value", and name it "DisableHWAcceleration". Double-click the new key and set the value data to 1.

Close the Registry Editor and restart your computer to apply the changes.
7. Run Troubleshooting Tools
Press Win + I to open Settings.
Navigate to "Update & Security > Troubleshoot > Other troubleshooters".
Select "Display issues" and click "Run".
Follow the prompts to complete the troubleshooting process and apply any suggested fixes.
8. Check for Windows Updates
Press Win + I to open Settings.
Go to "Update & Security > Windows Update" and click "Check for updates".
If updates are available, download and install them. Restart your computer after the updates are installed.
Check the "Update history" for any graphics card or hardware-related driver updates to ensure all drivers are up to date.
Follow these steps to troubleshoot and fix screen flickering in Windows 11. If the issue persists, contact hardware support or perform advanced repairs.
See also:
How to Fix Slow Printing Issues
Guide to Fixing Printer Not Printing in Color